Creating a Transparent Table in SAP
Creating a transparent table in SAP involves a series of steps. This guide will provide an overview of these steps, with detailed explanations of each step along the way.
Step 1: Planning
The first step in creating a transparent table is to plan the table structure. This includes defining the fields that will be included in the table, along with their data types and lengths. You should also consider any constraints or rules that will apply to the table, such as primary keys, foreign keys, and indexes.
Step 2: Defining the Table
Once you have planned the table structure, you can define the table in the SAP system. To do this, open the ABAP Workbench (SE80) and navigate to the Data Dictionary (SE11).
In the Data Dictionary, select the option to create a new table. You will be prompted to enter a name for the table and a short description. You should also select the option to create a transparent table.
Step 3: Adding Fields
After you have defined the table, you can begin adding fields to the table. To do this, select the “Fields” tab in the table definition screen. From here, you can add fields by clicking the “New Entries” button.
For each field, you will need to enter a name, data type, and length. You can also specify whether the field is a key field or not, and set any other properties that are applicable.
Step 4: Adding Primary Key
Next, you will need to add a primary key to the table. This key will be used to uniquely identify each record in the table. To add a primary key, select the “Keys” tab in the table definition screen.
From here, you can add a new key by clicking the “New Entries” button. You will then need to enter the name of the key, along with the field or fields that make up the key.
Step 5: Adding Foreign Keys
If your table will be related to other tables in the system, you may also need to add foreign keys to the table. These keys will ensure that the relationships between the tables are maintained. To add a foreign key, select the “Foreign Keys” tab in the table definition screen.
From here, you can add a new foreign key by clicking the “New Entries” button. You will then need to enter the name of the foreign key, along with the field or fields that make up the key. You will also need to specify the related table and key.
Step 6: Adding Indexes
Indexes can be added to the table to improve performance when searching or sorting the data. To add an index, select the “Indexes” tab in the table definition screen.
From here, you can add a new index by clicking the “New Entries” button. You will then need to enter the name of the index, along with the field or fields that make up the index.
Step 7: Activating the Table
Once you have defined the table and its properties, you can activate the table. This will make the table available in the SAP system. To activate the table, select the “Activation” button in the table definition screen.
Step 8: Testing the Table
After the table has been activated, you should test it to ensure that it is working as expected. You can do this by creating a program or transaction that reads from or writes to the table.
Lets Understand with an Example creating database table or creating a Transparent table in SAP.
Go to SE11 Transaction code.

Provide the table name.
Note: Table name must be start with either ‘Z’ or ‘Y’ Letter.
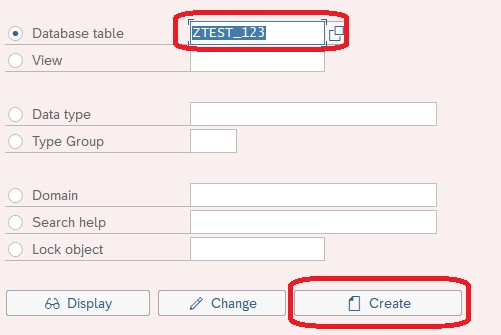
Let’s create a ZTEST_123 table.
Provide the table name and click on create button

Provide the Short Description and choose the Delivery class.

Note: For Delivery class and Data Browser/Table View Maintain. Choose according to your business requirement.
Here, we are selecting Delivery class ‘A’ and for table view Maintenance ‘Display Maintenance Allowed’.


Now, Go to Fields Tab and provide the field name and data elements name.
Field describes the name of the field which end user can see.
Data Element is used to define the type of data which field can contains.

How to create a Data Elements?
Double click on data element and click on Yes.

It will ask for package name. If you are creating table for project then provide the package name based on the module and project name or if you are creating a test table for testing purpose then better to choose local objects.


Now, Create a Data Element and Domain name.
How to create a Domain?

Double click on domain and create the domain and provide.
- Short description
- Data Type
- No of Characters
- Decimal Places if any

Click on save and activate the Domain and Data Elements

Now repeat the same steps for others field and choose the appropriate data type for each field.
Go to technical Settings.


Provide Data Class: APPL0 or as per your requirement.
Size Category: 0 or whatever your requirement.
Buffering: Allowed or not. If allowed, you have to select buffering type as well.

Important note: for interview point of view Domain, Data Elements, Data Class, Size Category and Buffering is very important.
Now, you can save and try to activate your table then you will get an warning message for Enhancement category.
Go to Extras menu and Enhancement category – > can be enhanced deep or as per your requirement.
If everything is fine, you can activate your table.
How to insert record in your table?
Go to Utilities – Table of Contents -> create Entries.

Conclusion
Creating a transparent table in SAP involves careful planning and attention to detail. By following the steps outlined in this guide, you can create a table that meets your needs and integrates seamlessly with the rest of the SAP system.
Click on save.
Now we have 1 record in our table.
FAQ’s : This blog will answer the following questions.
1. How to create a transparent or data base in table in SAP?
2. How to create a Domain?
3. How to create a Data Elements?
4. Types of Buffering in SAP ABAP?
5. How many types of Data Class we have in Data Dictionary.