Login to SAP Website
- Go to Google
- Search for www.sap.com
- At the top right Corner click on – Log in or create an SAP account
- If you already have account then login with your account if not create an account.
Login to SAP BTP Trail Account
Once activated, or if you already possess an SAP account, navigate to the SAP BTP Trial page and select Log On.
A dialog will appear, prompting you to confirm the terms and conditions for the SAP BTP Trial. Simply check the boxes to acknowledge and click Accept. This action seamlessly integrates the SAP.com registration with your login account on SAP Cloud Identity
Welcome Screen
You will get the following screen
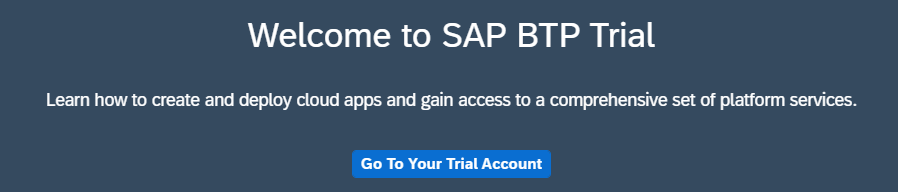
Click on Go to Your Trail Account.
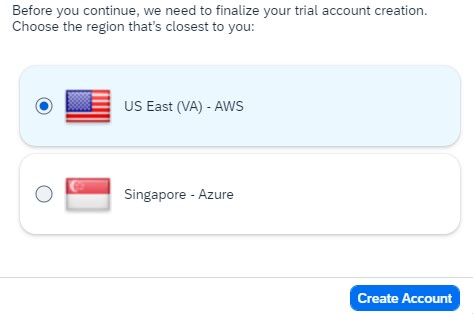
You can choose your nearest server location.
Following the setup process, a dialog box will appear. Once the setup is complete, click Continue to close the popup and access your new account seamlessly.
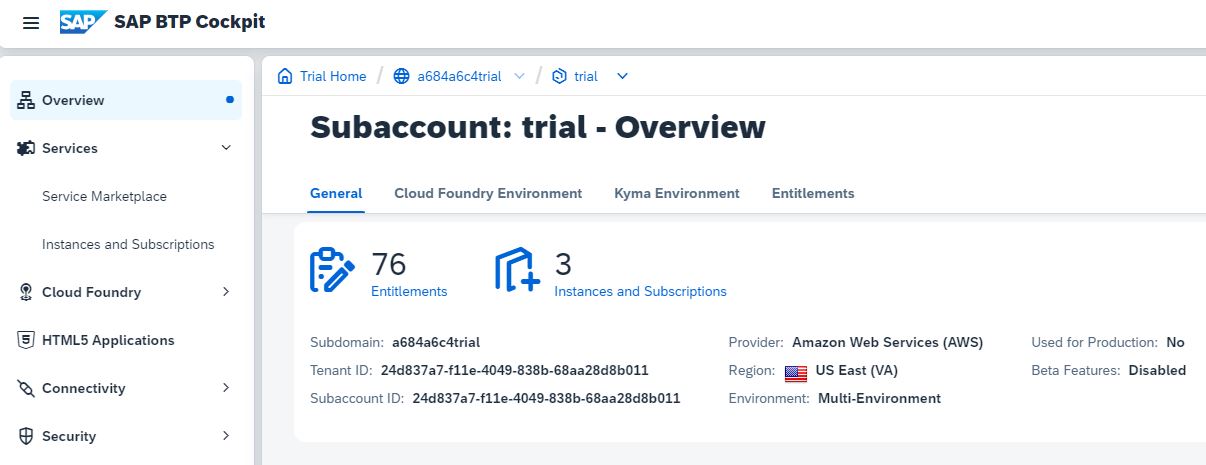
Within the global trial account, you’ll find one sub-account and space. To navigate to the sub-account, simply click on the tile named “trial” (please note that the name might vary if you manually created the sub-account). This user-friendly process ensures easy access and management of your SAP BTP resources.
Once you will click on create account it will take few minutes to setup the account.
Preparing ABAP Environment with SAP BTP
- When company decide to migrate its existing ABAP Environment to SAP BTP.
Company Administrator: Lisa is part of the IT Administrator team at XYZ Company. Her Team is talking about setting up an environment in SAP BTP. This will include creating a seamless transition from the on-premises ABAP environment to the cloud, Improved collaboration and optimized operational expenses.
Lisa is ready to start with the setup but before that we have to check if she fulfil the pre-requisite or not.
Pre-Requisites:
-
-
- Does Lisa have subaccount administrator authorization in SAP BTP?
- Does Lisa have ABAP Service as an Entitlement?
- Does Lisa Have Web Access for ABAP service as an Entitlement?
-
Lets check together:
Application Requirements:
-
-
-
- Eclipse: Install Eclipse from www.eclipse.org
-
-
-
-
-
- ADT (ABAP Development Tools) ADT
-
-
After Installing Eclipse in your system.
-
-
-
- Go to Help Menu
-
-


-
-
-
- Click on Install new software!
- Install new Software.
- Pass the following link : https://tools.hana.ondemand.com/latest
-
-
Different types of ABAP Projects: Using Eclipse we can connect with different ABAP Environments. In ADT we have two types of projects:
- ABAP Cloud: This is used to connect either SAP ABAP on BTP or SAP S/4 HANA Cloud System.
- ABAP Project: This is useful for ABAP on Premise System

- Overview of SAP ABAP Environment

The SAP Business Technology Platform
serves as SAP’s dedicated platform as a service (PaaS), offering a diverse
array of functionalities. Access to this platform requires the creation of a
global account, within which lie distinct subaccounts. These subaccounts grant
versatility, enabling tailored configurations for different functionalities.
This flexibility allows a single enterprise to operate multiple platforms while
efficiently managing its subscription through a unified global account setup.
When setting up your subaccount, the deployment
of runtimes like Cloud Foundry or Kyma becomes essential. These runtimes serve
as the groundwork, paving the way for the deployment of an ABAP instance, a
crucial component in leveraging the SAP Business Technology Platform’s
capabilities.
Global Accounts and Subaccounts
Set Up Sub accounts
To initiate the creation of the ABAP instance, log in to your subaccount within the SAP Business Technology Platform (BTP) system. It’s crucial to be the designated subaccount administrator to ensure you possess all the necessary rights for system administration.
For guidance, please refer to the accompanying screenshot. Navigate to the Security section in the left navigation bar, select Users, and click on your user to access the user detail page. Within the Role Collections section, you can easily identify the assigned role collection, specifically labeled as “Subaccount Administrator.” This streamlined approach guarantees that you have the requisite permissions to seamlessly administer the SAP BTP system.

ABAP Entitlements
Check ABAP Entitlements
As a subaccount administrator, it is essential to have the requisite permissions for administering the SAP Business Technology Platform (BTP) system.
Let’s verify if Lisa, in his role as a subaccount administrator, has entitlement to the ABAP service.
Begin by checking the left side navigation bar of your subaccount under Entitlements. Confirm the availability of the ABAP environment service. In case this entry is missing, please reach out to your Global Account Administrator for your SAP BTP accounts. Refer to the accompanying screenshot for assistance.
For optimal configuration, ensure the following plans are present within the ABAP Environment service:
- Plan abap_compute_unit with at least one quota.
- Plan hana_compute_unit with a minimum of two quotas.
- Plan standard, which is shared.
Note that the minimum configuration, involving one ABAP compute unit and two HANA compute units, is often sufficient for creating a service instance for the ABAP environment. If additional resources are needed, opt for higher quotas. Keep in mind that adjusting SAP HANA Cloud storage using the parameter size_of_persistence_disk consumes 0.002 HANA compute units for each GB exceeding the minimal size of the persistence disk.
The SAP BTP ABAP Environment accommodates two Cloud Foundry service plans for ABAP systems:
- Standard, suitable for normal development, testing, and productive systems.
- Saas_oem, designed for systems providing multitenancy SaaS applications.
Opting for the standard service plan allows independent sizing of the ABAP runtime and SAP HANA memory. To facilitate sizing, also select the quota plans abap_compute_unit and hana_compute_unit.
Please note that the service plan 16_abap_64_db, a predecessor of the standard service plan, has been deprecated.
Lets check together:
Cloud Foundry
Enable Cloud Foundry
As the ABAP instance functions as a service operating on the Cloud Foundry runtime, it’s imperative to activate Cloud Foundry within your subaccount if you haven’t already. Simply select “Enable Cloud Foundry” to seamlessly integrate this runtime into your operations.
Steps to Enable Cloud Foundry in SAP Business Technology Platform (BTP)
Log In: Access your SAP BTP account and log in with your credentials.
Navigate to Subaccount: Once logged in, navigate to your subaccount where you intend to enable Cloud Foundry.
Access Services: In the left navigation bar, find and select the “Services” section.
Enable Cloud Foundry: Within the Services section, locate and click on “Enable Cloud Foundry.” This step initiates the activation process.
Confirmation: Follow the on-screen instructions and confirm your decision to enable Cloud Foundry in your subaccount.
Wait for Activation: The system will process your request, and you may need to wait briefly while Cloud Foundry is being enabled.
Verification: Once the activation is complete, verify that Cloud Foundry is now active in your subaccount. You should see the relevant indicators or notifications confirming the successful activation.
By following these user-friendly steps, you can seamlessly enable Cloud Foundry in SAP BTP, unlocking its capabilities for your development and deployment needs.
Cloud Foundry Space
Create Space
Spaces offer users a collaborative environment for streamlined app development, deployment, and maintenance. Within an organization, multiple spaces can exist, each serving as a distinct workspace. It’s important to note that each app, service, and route is specifically associated with a designated space, ensuring a well-organized structure.
To regulate access to these resources, roles play a crucial role in access control. Each space role is tailored to apply exclusively within its designated workspace, enhancing security and precision in resource management. This setup ensures an efficient and organized approach to app development and management within the SAP BTP environment.
Steps to create Space in Cloud Foundry
Access SAP BTP: Log in to your SAP BTP account using your credentials.
Navigate to Cloud Foundry: In the left navigation bar, locate and select the “Cloud Foundry” section.
Choose Organization: Within the Cloud Foundry section, choose the organization where you want to create a new space. An organization can have multiple spaces to organize your development and deployment activities.
Select Spaces: Once inside the organization, find and select the “Spaces” option.
Create New Space: Look for an option to create a new space, often labeled as “Create Space” or something similar. Click on it.
Provide Details: Enter the necessary details for your new space, such as the name and any additional information required.
Confirm and Create: Review the details to ensure accuracy, and then proceed to create the new space.
Verification: After creation, verify that the new space appears in the list of spaces associated with the selected organization.
By following these steps, you’ll successfully create a new space in Cloud Foundry within SAP BTP, facilitating a well-organized and efficient environment for your app development and deployment activities.
How to Create a Service Key
Go to – https://account.hana.ondemand.com/cockpit#/home/allaccounts
Go to SAP BTP Cockpit – create your trail account and registered with your corresponding server.
ABAP Instance
Steps to Create an ABAP Instance
Access SAP BTP: Log in to your SAP BTP account using your credentials. Navigate to the SAP BTP cockpit to begin the process.
Choose Your Subaccount: Once logged in, select the appropriate subaccount where you want to create the ABAP instance.
Navigate to Services: In the left navigation bar, find and click on the “Services” section. or In the Wizard section open service dropdown list and select ABAP environment. Open the plan dropdown list and select standard.
Select ABAP Environment: Look for the ABAP Environment service. If it’s not listed, contact your Global Account Administrator for assistance.
Initiate Creation: Start the creation process for the ABAP instance. Follow on-screen instructions and provide any required details. Open the Runtime Environment dropdown list and select Cloud Foundry.
Select Your Space: Open the Space dropdown list and choose the space you previously created. This helps ensure that your instance is aligned with the desired workspace.
Name Your Instance: In the Instance Name field, enter a user-friendly name that is compatible with the Command Line Interface (CLI). Proceed to the next step once you’ve chosen a suitable name.
Configure Instance Parameters: Customize the configuration by providing additional instance parameters. You can do this effortlessly by either using the default form or opting for flexibility – upload a JSON file from your computer or specify the parameters directly in JSON format. This allows you to tailor the setup to your specific needs with ease.
Wait for Completion: Allow the system some time to complete the creation of the ABAP instance. This process may take a few moments.
Verification: Once the creation is complete, verify the successful setup of the ABAP instance. Confirm its availability and functionality within your SAP BTP environment.
For comprehensive details regarding additional instance parameters essential for the configuration, please check the following table. This valuable resource provides in-depth insights to ensure a well-informed setup tailored to your specific needs.
| Parameters | Description |
|---|---|
| Admin Email Address | Use the Admin Email Address to automatically create the initial administrator for the ABAP Instance. This includes assigning the administrator role to the specified user. Access to the ABAP environment system is only granted to this designated user. By default, the email address serves as the subject name identifier. Note that using email addresses as identifiers may not be possible if they are ambiguous across users or if the trusted identity provider uses the subject name identifier Login Name. In such cases, you can switch to user_name via the parameter and provide the user name for the initial user in the Admin User Name parameter. |
| ABAP System Description | The ABAP System Description is an optional field. |
| Development System | The Development System checkbox is selected by default. This setting allows you to control the changeability of development objects in the system. If you wish to safeguard customer-related software components and ABAP namespaces against manual changes via ABAP Development Tools, clear the checkbox. This setting is typically used for test and productive systems where changes must be imported only. Refer to available business catalogs in development systems for more information. |
| ABAP System ID | The ABAP System ID must consist of exactly three alphanumeric characters, with only uppercase letters allowed. The first character must be a letter (not a digit), but the ID does not need to be technically unique. |
| ABAP Runtime Size | The ABAP Runtime Size (parameter size_of_runtime) refers to the size of the ABAP runtime and is part of the quota plan abap_compute_unit. One ABAP compute unit represents 16 GB, and the supported number of abap_compute_unit options includes 1, 2, 4, 6, 8, 16, or 24. |
| HANA Memory Size | The HANA Memory Size (parameter size_of_persistence) refers to the size of SAP HANA memory and is part of the quota plan hana_compute_unit. One HANA compute unit represents the suitable block size for the underlying SAP HANA Cloud instance (15 GB on AWS or 16 GB on Microsoft Azure). The supported number of hana_compute_unit options per HANA instance includes 2, 4, 8, 16, 32, or 64. |
| Size of Persistence Disk | The Size of Persistence Disk (parameter size_of_persistence_disk) refers to the size of SAP HANA Cloud storage in GB. If set to auto, the SAP HANA Cloud storage size is adjusted based on the minimal and maximum allowed values. Exceeding the maximum value incurs an additional consumption of HANA compute units (HCU) for each GB. The HCU ratio of additional storage disk to RAM is 1:33.33 per GB on AWS (as 1 HCU = 15 GB) and 1:31.25 per GB on Microsoft Azure (as 1 HCU = 16 GB). The parameter settings determine the storage configuration for optimal performance. |
By following these steps, you’ll seamlessly create an ABAP instance in SAP BTP, paving the way for efficient development and deployment of ABAP applications.
Company Administrator: Lisa is part of the IT Administrator team at XYZ Company. Her Team is talking about setting up an environment in SAP BTP. This will include creating a seamless transition from the on-premises ABAP environment to the cloud, Improved collaboration and optimized operational expenses.
Lisa is ready to start with the setup but before that we have to check if she fulfil the pre-requisite or not.
Pre-Requisites:
- Does Lisa have subaccount administrator authorization in SAP BTP?
- Does Lisa have ABAP Service as an Entitlement?
- Does Lisa Have Web Access for ABAP service as an Entitlement?
Lets check together:
Application Requirements:
- Eclipse: Install Eclipse from www.eclipse.org
- ADT (ABAP Development Tools) ADT
After Installing Eclipse in your system.
- Go to Help Menu
- Click on Install new software!
- Install new Software.
- Pass the following link : https://tools.hana.ondemand.com/latest
Different types of ABAP Projects: Using Eclipse we can connect with different ABAP Environments. In ADT we have two types of projects:
- ABAP Cloud: This is used to connect either SAP ABAP on BTP or SAP S/4 HANA Cloud System.
- ABAP Project: This is useful for ABAP on Premise System
- Overview of SAP ABAP Environment
The SAP Business Technology Platform
serves as SAP’s dedicated platform as a service (PaaS), offering a diverse
array of functionalities. Access to this platform requires the creation of a
global account, within which lie distinct subaccounts. These subaccounts grant
versatility, enabling tailored configurations for different functionalities.
This flexibility allows a single enterprise to operate multiple platforms while
efficiently managing its subscription through a unified global account setup.
When setting up your subaccount, the deployment
of runtimes like Cloud Foundry or Kyma becomes essential. These runtimes serve
as the groundwork, paving the way for the deployment of an ABAP instance, a
crucial component in leveraging the SAP Business Technology Platform’s
capabilities.
Creating an ABAP Instance Service Key
How to create ABAP Instance Service Key
Within the SAP BTP cockpit, you have the capability to generate a service key for your ABAP system. This service key proves handy for subsequent logins to the ABAP instance through the ABAP Development Tools (ADT).
Service keys, in general, empower you to generate credentials for direct communication with a service instance. Once configured, these service keys can be utilized by local clients, applications in different spaces, or external entities, enhancing accessibility to your service deployment. It’s a convenient means for your deployment components to establish communication with your ABAP environment.
For users of ADT, there’s an alternative approach. Rather than relying on an existing service key, developers and other users equipped with a username and password for the ABAP system can employ the project creation wizard in ADT. This wizard facilitates logging into the ABAP service instance, utilizing the service key automatically provided by the service instance. This flexibility ensures that both administrators and developers can seamlessly access the ABAP environment based on their specific needs and preferences.
- Navigate to your SAP BTP subaccount containing the pre-established ABAP Instance.
- Click on the ellipsis button and opt for “Create Service Key.”
- Assign a name to the service key and proceed to create it.
- Save your selections.
- You can either choose the name of the service key or click on the ellipsis button, then select “View” to access and copy the generated JSON. This JSON can be stored for future use.
How to maintain Business Users
Management of Identity and Access
Management of Identity and Access comprises essential components, including:
- User and Identity Management
- Roles and Authorization
- Authentication
During the configuration phase, administrators handle the registration and authorization of access rights. In the operational phase, business users go through identification and authentication processes, gaining access to applications based on previously authorized rights.
In practical terms, administrators oversee the authentication and authorization of business users, configuring trust and identity federation in the Subaccount. This often involves setting up a custom identity authentication service tenant. As a backup, SAP ID service is configured as the default identity provider. Administrators also play a role in role management by creating roles using templates, incorporating roles into collections, and assigning these collections to business users. Subsequently, business users can log in to SAP Fiori applications for authentication purposes.
To access the Identity and Access Management features, navigate to the Administration menu of the administration launchpad. This user-centric approach ensures a secure and streamlined process for managing user identities and access permissions.
Maintain Business Users
This application serves as a tool for granting access rights and managing settings for business users.
Access to Fiori applications for business users is facilitated through business roles. A business role can encompass one or multiple business catalogs, each containing several apps.
Key functionalities of this application include:
- Editing Business User Data: Easily modify business user information as needed.
- Assigning and Removing Business Roles: Streamlined assignment and removal of business roles for users.
- Updating User Role Assignments: Effortlessly make updates to user role assignments.
- User Locking: Securely lock users to restrict their system access temporarily.
- User Unlocking: Release user locks to restore regular system access.
- Downloading User Lists: Obtain a downloadable list of users for reference.
- Setting User Interface Language: Individualized setting of the user interface language for each business user.
Empowering administrators with these capabilities ensures efficient management of user access and settings, enhancing the overall user experience within the Fiori environment.
- To initiate the application, select the tile titled “Maintain Business Users.”
- On the main screen, click on “New.”
- Choose the employee for whom you wish to create a user and complete the necessary fields.
- For the User Name, input an identifier or ID matching the login name of the same user in the identity provider. Note that the user name is restricted to uppercase letters, numbers, and underscores. It should not exceed 40 characters, and must not commence with an underscore or with “SAP.”
- To provide users access to applications, assign relevant business roles. In the “Assigned Business Roles” section, click on “Add.” Check the box for the ABAP developer role (SAP_BR_DEVELOPER) to grant development access, while the other Business Role pertains to administering the ABAP dashboard. Confirm your selections by choosing “OK.”
- Save the newly created Business User. These steps ensure a seamless setup, allowing for efficient user management and access control within the application.
Setup ABAP Development Tools on Eclipse
ABAP Development with ABAP Development Tools (ADT) on Eclipse
ABAP Development Tools for Eclipse stands as SAP’s cutting-edge integrated development environment (IDE) tailored for ABAP development within the open Eclipse platform.
This dynamic toolset empowers developers to execute a spectrum of ABAP-based tasks, enabling the construction, extension, and execution of ABAP applications across various SAP products. Whether engaged in classic ABAP development for solutions like SAP S/4HANA or venturing into cloud development with SAP BTP, ABAP Environment, and SAP S/4HANA Cloud, the ABAP development tools for Eclipse provide a versatile and comprehensive solution.
Key Features:
Flexible Eclipse UI:
- Enjoy a highly flexible and customizable Eclipse user interface designed specifically for ABAP development tasks.
Multi-System Development:
- Conduct high-performance, failover-safe online development across multiple ABAP systems simultaneously.
Parallel Object Handling:
- Efficiently display and edit multiple ABAP objects in parallel, enhancing productivity.
Advanced Code Editing:
- Experience advanced source code editing with robust refactoring support, ensuring code quality and maintainability.
Task-Oriented Development:
- Benefit from optimum support for task-oriented and test-driven development methodologies.
Quality Assurance Tools:
- Access reliable quality assurance and supportability tools for robust development practices.
Extensibility with Eclipse Plug-ins:
- Leverage the built-in extensibility of the IDE using the well-established Eclipse plug-in technology.
ABAP Development Tools for Eclipse represents a modern and feature-rich toolset where developers can harness capabilities such as the following, making it an invaluable asset in the realm of ABAP development.
Embark on a Seamless ABAP Development Journey with Eclipse: A Step-by-Step Guide
Setting up ABAP Development Tools (ADT) on Eclipse is a straightforward process that opens the door to a world of efficient ABAP development. Follow these steps to seamlessly configure your environment and empower your development endeavors:
Steps in Eclipse to Setup ABAP Development Tools
1. Install Eclipse:
- Begin by installing Eclipse, the preferred integrated development environment for ABAP. Ensure you choose the Eclipse IDE for Java EE Developers version, as it includes essential components for ABAP development.
2. Launch Eclipse:
- Open Eclipse on your system and get ready to configure ABAP Development Tools.
3. Access Eclipse Marketplace:
- Navigate to “Help” > “Eclipse Marketplace” within Eclipse

4. Search for ADT:
- In the Marketplace dialog, search for “ABAP Development Tools (ADT).”
5. Initiate Installation:
- Select the ADT plugin from the search results and click “Install.”
- Follow the on-screen instructions to complete the installation. Eclipse will prompt you to restart after the installation is finished.
6. Configure ABAP System Connection:
- After restarting Eclipse, navigate to “Window” > “Preferences.”
- Expand “SAP” in the left navigation pane and select “ABAP Development.”
- Click on “Systems” and then “Add ABAP System.”
- Enter details for your ABAP system, including system ID, application server, client, and logon credentials.
- Click “Finish” to save the system configuration.

7. Open ABAP Perspective:
- Switch to the ABAP perspective by going to “Window” > “Perspective” > “Open Perspective” > “Other.”
- Select “ABAP” from the list of perspectives and click “OK.”


8. Connect to ABAP System:
- In the ABAP perspective, click on the “ABAP Development” icon in the toolbar.
- Right-click in the “ABAP Development” view, select “Add ABAP System,” and choose the configured ABAP system.
9. Commence Development:
- With ADT configured, you are ready to commence your ABAP development journey. Create or open ABAP projects within Eclipse, and leverage the powerful features offered by ADT.
By following these steps, you’ll seamlessly set up ABAP Development Tools on Eclipse, providing a robust environment for efficient and streamlined ABAP development. Happy coding!
In Eclipse – Go to File – New – ABAP Cloud Project

Then select the radio button ” Use a Service Key” and pass the JSON code.

To Get the JSON Code -> go to -> https://account.hanatrial.ondemand.com – create a trail account.

Go to your Trail Account – > and setup your account -> you will get a JSON file download that file.
Now, Your setup is ready for coding.